 Last week I had to translate a long medical questionnaire. The source text was a single column in an Excel file and I was instructed to translate cells with an orange fill, which were the questions addressed to the patient. Processing the file in Studio turned out to be slightly trickier than I expected, so I’m sharing my workaround here.
At the end of this post, I’ll explain how I used AutoHotkey to save a few thousand keystrokes in this project!
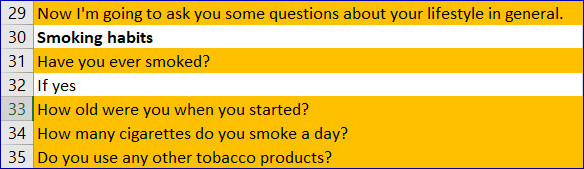
I can’t share the file itself for confidentiality reasons, so I mocked up a similar one in English to show what it looked like:
Problems:
- Studio doesn’t show this orange formatting, even in the WYSIWYG display, so I couldn’t tell which cells I had to translate. The file was huge, with 9500 rows (67,000 words) and I only had to translate about 1500 rows, so manually skipping the not-for-translation cells wasn’t an option.
- You can customise Studio to exclude a specific font colour, but not highlighted text or colour-filled cells. (If you ever want to filter by font colour, go to Project Settings> File Types> MS Excel 2007-2016>Exclusions)
Solution:
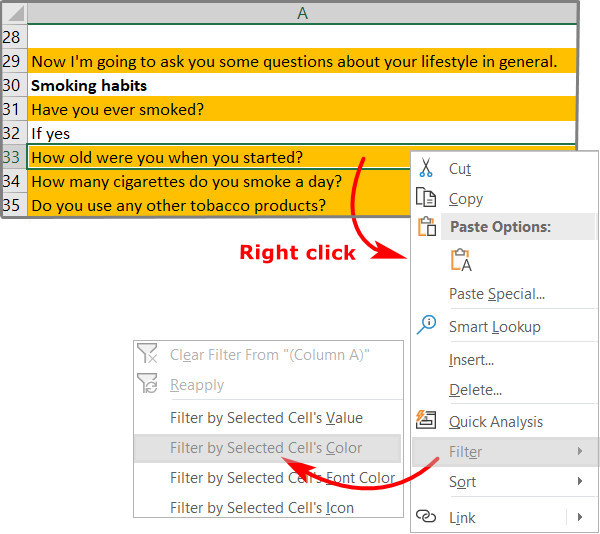
In Excel, I set up a filter to display only the cells with orange fill. To do this, I right clicked one of the orange cells and selected Filter > Filter by Selected Cell’s Color
If the right-click method doesn’t work, try this:
- Select the column
- In the home tab in the ribbon, click Sort & Filter and then Filter to add a dropdown filter arrow to row 1 of the selected column
- Click the dropdown arrow, go to Filter by color and select the desired coloured fill
I opened the file in Studio. Only the orange cells were displayed:

After finishing the translation and saving the file, I cleared the filter in Excel by clicking the filter symbol at the top of the translated column and selecting Clear Filter.
AutoHotkey trick
You might have noticed that almost all the segments I translated in this project ended with a question mark. In fact, the questionnaire had well over 1000 questions, which meant that at the end of most segments, I had to press shift, question mark, control and enter (to confirm the segment and move to the next). Four keystrokes.
To transform these four keystrokes into a single one for this project, I remapped the ñ key with AutoHotkey (AHK):*
ñ::
Send, ?{Control Down}{Enter}{Control Up}
return
I then added a first line to tell AHK to deploy this code in Studio only, so the ñ key was fully functional in other programs.
#IfWinActive ahk_exe SDLTradosStudio.exe
AutoHotkey is a free program that performs repetitive tasks in any Windows application through customised scripts. To learn more about AHK and Studio, check out the SDL Community AutoHotkey forum.
By customising the display and reducing keystrokes, I had more time to focus on the translation itself. I hope these two tricks inspire you to look for similar workarounds.


Hi Emma,
Two great tips. I’ve used “Transtools” in the past for this kind of work. It’s free software and can be used in Excel, Word and AutoCAD. I found it extremely useful in AutoCAD when I was translating a lot of DWG and DXF files.
Best regards,
Ben
Ben, you’re right, Transtools is great for processing highlighted text in Word (and many other things too). I didn’t know it had a similar feature in Excel, but in this particular case the Excel filter function worked just fine.
Nice! I get some Excel files when I do financial translations, but have not come across having to do only highlighted cells. Thanks! I’m sharing! 🙂
Thanks, Karin!
Very interesting! Thanks, Emma!
You are a genius Emma, what a great workaround! Thank you for your invaluable help not only in this case but also in general.
That was timely, thank you! One just came in today! However, when creating the translated doc, I couldn’t find where to undo the filter. Never mind, copying the translated column and pasting into the source doc worked beautifully, filtered and unfiltered cells showed up perfectly.
Glad you could test it in real life, Heather! The “Clear filter” should be visible when you right click in that column, and you should also see it up in the ribbon. Anyway, it’s good that you got it sorted in the end.
Nope, that’s just what I was looking for, it all appeared in grey. Anyone else who has the same problem can be comforted by the easy solution.
Is it just me or am I the only one who hates working with Excel files? The idea is fine, in theory, if the file has been prepared and formatted properly, but that is practically never the case. At least that’s been my experience. Reformatting it is often not an option, either because the customer does it that way for a reason, or for additional reasons. Anyway, you made some interesting points there. Good luck for the future!
I like working with Excel files in Studio! Segmenting is much more straightforward than in Word files, and you can do a lot to prepare an Excel file before processing it in Studio (hiding/copying columns, filtering certain cells, etc.)
Hi Emma,
It is possible to exclude colour-filled Excel cells in Trados. On the Exclusions tab you mention in your article the very first option allows you to do just this – “Exclusions by color”. I have used this option in the past and it worked well for me.
Or am I missing something here and this doesn’t help with your case?
Unfortunately, the “Exclusions by color” feature only lets you exclude font in a certain colour. It has no effect on highlighted (colour-filled) cells.