 This post is for people who are not in a hurry to translate their very first file in SDL Trados Studio but want to create a translation memory (TM) carefully and conscientiously. It’s also for people who’ve already set up a translation memory (TM) with all the default settings and are now wondering whether they should have prepared it more thoroughly. (More on that at the end of this post.) Read on to learn how to define TM fields, customise abbreviations and implement other language resources, step by step.
To create a new translation memory, click Alt+Shift+N (or go to File > New > New Translation Memory) and follow the steps below:

General
- Create From: leave blank to start your TM from scratch.
- Name: Give the TM a meaningful name (this could be the client’s name, a working field, genre, etc.). Appending the language pair to the name is a good idea if you work with several languages and directions, e.g., Client A_ES-EN
- Description and Copyright: Optional fields. (I leave them blank.)
- Location: Think carefully where the TM is to be saved. I have a single folder for all my TMs. Some people prefer to store their TMs in client folders.
- Select Source and Target languages.
- Enable character-based concordance search. I leave this box unticked. As your TM grows, searching for fuzzy matches by small character groups tends to be unhelpful (e.g., “melon” will be returned as well as “lemon”). Unfortunately, this setting can’t be changed later.
- Most beginners’ instructions suggest clicking Finish. Don’t! Instead, click Next.
Fields and Settings
Fields added in this step will provide immediate information during translation when your TM returns a match in the look-up window. Later, fields will be vital for TM maintenance, filtering and applying penalties. (See this post on penalties and filters.)
Off-topic: Before continuing with the TM creation wizard to set up these fields, it’s important for you to know that you will need to update the field values every time you start a new translation. To do that, when your TM is attached to a project and you’re about to start a translation, take time to go to Project Settings (F2) > All Language Pairs > Translation Memory and Automated Translation. Check the update box to see which TM you’re going to add field values to and update with newly translated segments:
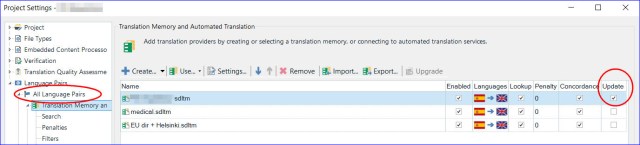
(Note that you can only update field values in the first TM in this list.)
Then, still in Project Settings, click on your specific language pair in the left-hand navigation menu > Translation Memory and Automated Translation > Update and fill in the details in the Value column:

Back on topic: Now you know when and where to complete the field values, let’s return to the TM creation wizard to set up those fields:
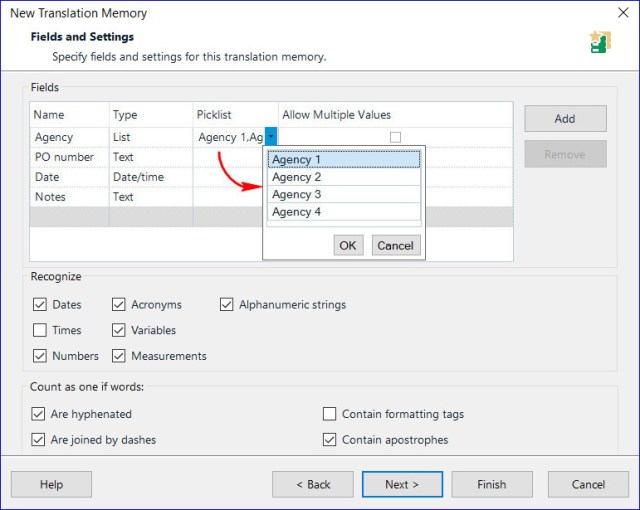
Your Fields’ list will be empty. Click Add.
Name. Fields can be work areas, client or agency names, PO numbers or even a simple note. Examples of unusual fields I enter in some TMs are Country (a list of Spanish source language countries), From (showing the source of official parallel texts in a regulatory TM) and Protocol (denoting which clinical trial I’m working on).
Type. Depending on the field itself, you may want to define type as free text (this is harder to search for later), number, date/time (see note below) or a list (a set list of items, which can be edited at any time). Note that a translation unit (TU) always contains the date and time as a system field, so the date/time type is largely redundant.
Picklist. If you selected list as the field type, this is where you add the list items.
Allow multiple values. When a TU is reused, the attributes will grow if this setting is ticked (e.g., a new PO number will be added each time a TU is used). This gives you more historical information but may become unwieldly. I mostly leave this unticked and the most recent entry replaces older details.
(Note that if you enable Allow multiple values and then disable it in the future, you will lose all data stored for that field.)
Recognize. The items here are known as tokens (or placeholders in older Studio versions) and may be a single word or a string. When enabled, the tokens – dates, times, numbers, etc. – can be transferred directly or localised in the target segment, thus improving segment matches and saving typing. They’re displayed in the source segment of the Editor window with a blue underscore-type bracket. I enable all except Times, because this token is often badly formatted in my source language.
Count as one if words… This simply changes the way Studio performs a wordcount. For example, if Contain apostrophes is ticked, the word “can’t” will be counted as one word. Keep Contain formatting tags unticked, because rogue formatting tags embedded inside a word should definitely be reflected in a higher wordcount.
Click Next.
Language Resources
Language resources refer to settings in the source language that define how Studio will segment the source file and recognise certain words or strings.

Template: Default is None. Templates can be created in the Translation Memories window under New > language resource. A template isn’t necessary if you base future TMs on a TM that already has these language resources defined. (See last paragraph in Abbreviations for more details.)
Language: This refers to your source language.
Resources:
Variable List. Variables are single words or strings that, paradoxically, do not vary in source and target languages. The list is empty by default. Names of brands, companies and people can be added so that they can be called up or transferred directly to the target segment. In practice, names I’ve added over the years make little difference to my segment matches, so I don’t use it much. However, if you find the variable list useful, it’s very easy to import, export and edit the list with an SDL app called Variables Manager.
Abbreviation List. This list is extremely useful to define how Studio segments a file. For example, if English is the source language, “Mrs. Smith” would be split into two segments following standard segmentation whereby a new segment starts after a full stop. However, “Mrs.” is in the default abbreviations list, so Studio knows not to break it up.
Each language has its own abbreviations, and the default list – in Spanish at least – lacks some essential entries (Att., Av., abr., Blvd., Dña., Dra., to name just the first few in my customised list).
The big disadvantage of this list is that it has no import/export feature, and to add to the list you have to click Edit, scroll to the bottom and double click in the bottom row. For this reason, it’s important that once you’ve set up a working list, make sure you use this TM to transfer all abbreviations and other language resources to new TMs in the future. To do that, when you create a new TM from now on, browse to this TM in the very first step in the wizard, “Create From”.
Ordinal Follower List. This is empty in many languages, but is used where a capitalised word follows an ordinal number and full stop (e.g. 30. Juni).
Segmentation Rules. The choice between paragraph and sentence based segmentation is fairly clear. If Studio segments your text only when it comes to a paragraph mark, segments will be too long. Paragraph segmentation might be worth considering if you need to restructure ideas within a paragraph, but remember that the setting is implemented before you open the file in the Editor window, and it applies to the whole file.
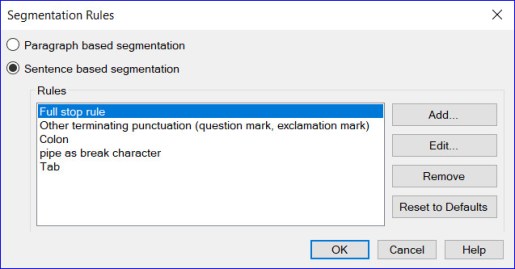
By default, Studio starts a new segment after a full stop, a question mark, exclamation mark or a colon followed by a space and an uppercase letter. To learn how to add more rules, such as forcing a new segment to start after a semi-colon, a tab or a soft return, see Nora Diaz’s posts on segmentation.
Note that if you have more than one TM in a project, files will be segmented according to the rules set in the first TM in the list.
When you’ve finished setting up the segmentation rules, click OK to return to the Language Resources window.
Click Finish!
Start using the new TM
Next time you translate a file by setting up a project (File > New > New Project) or as single file by using Translate as a single document in the Welcome view, don’t forget to add your newly created TM!
What to do with your very first default TM
If you’ve been working with a TM bereft of fields, it’s not too late to add some now and start using them. Go to the Translation Memories window and open the TM. It’ll appear in the left-hand navigation menu and in the main window. Close it in the main window. Click Settings in the ribbon, and add Fields and Settings and Language Resources as explained above.
Enjoy your new TM!

