 I’ve written about Fragment recall and repair and the Advanced display filter in previous blog posts. What else is new in SDL Trados Studio 2017? Drag and drop, segment merging and AdaptiveMT, to name but a few. Here’s a review of these features and some other smaller changes that are also worth a mention.
- Drag and drop
- Merge across hard return
- AdaptiveMT
- Termbase viewer
- High-DPI monitors
- File Types: Preview file
- Bunch of little improvements
To start a new translation, experienced users probably bypass the Welcome window altogether. They’ll also know that since Studio 2014, you can drag and drop a file into the project view or directly into the Editor window.
However, new users will be pleased to hear that you can now drag and drop files into the Welcome view and (almost) start translating right away.
Welcome views in Studio 2015 and Studio 2017:

(Tip: If you’re running Studio 2015 and 2017 side by side, the new Welcome view is the quickest way to tell which program you’re in.)
The new drag and drop feature is smart. Drag over a single file and Translate Single Document will be highlighted as your next step. Drag two or more files over and Create New Project will be suggested.

The drag and drop feature works by creating a “Dropfile” folder in C:\Users\[username] \Documents\Studio 2017\Projects\DropFiles and copying the source file there. However, if you create a new project (instead of a single document translation) the source file will be saved in the project source language folder.*
*Learn more about drag and drop in this Knowledge Base article
If you like the sound of this drag and drop feature, maybe you’re using Studio for the first time? Check out my post on translating your very first file in Studio (just updated to include Studio 2017).
Merge across hard return
Since Studio 2011, there’s been a workaround for merging segments separated by a paragraph mark (also known as a hard return). Now, in Studio 2017, very similar steps take place in the background, and users can happily select two or more segments (click Alt+shift+down arrow), right click in the number column and then click Merge Segments. Result: The segments after the first are hidden, locked and marked as translated.
Before:

After:

(Note that segment 53 isn’t hidden in the screenshot above. More on this below.)
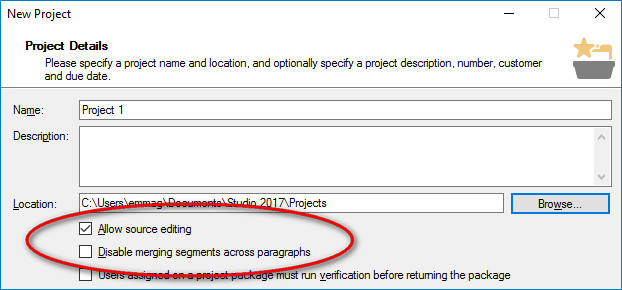
How to activate:
When you create a new project, make sure that source editing and disable merging segments are marked like this:
In on-going projects, click Project Settings>Project and make sure the above two options are set as in the screenshot above.
To hide or not to hide?
Default behaviour is to hide empty segments after merging. That makes for a clean display in the Editor. However, I recommend keeping empty segments visible after merging because it’s quite a fragile process. Keeping all segments visible will remind you to watch out for strange behaviour in Word if you merge across bullet points, different fonts, etc.* Also, if you undo merging with Ctrl+Z, you won’t see the unmerged segment at all if it’s hidden.
*For more details, check out Paul Filkin’s post on Bridging the Divide.
Hiding/unhiding segments is customised in general options. This is what my settings look like: File>Options>Editor>Automation:

(Note that I’ve also enabled Apply better match if found in TM after merging segments, which is off by default.)
AdaptiveMT
In Studio 2015 and earlier, users could connect to the Language Cloud and get suggestions from the SDL machine translation (MT) provider.
Now, the MT engine in your personal account will learn from the edits you make, improving the quality of results as you work. This is the basics of SDL AdaptiveMT technology.
AdaptiveMT has been rolled out from English into FIGS (FR, IT, DE, ES) and Dutch. Apparently, the plan is to implement these languages into English, adding Portuguese and Japanese after that. The free version that comes with a Studio 2017 license gives you one Adaptive Engine and 400,000 characters per month.
Since Spanish to English hasn’t arrived yet, I can’t comment on the results, but I look forward to testing it in due course.
Termbase viewer
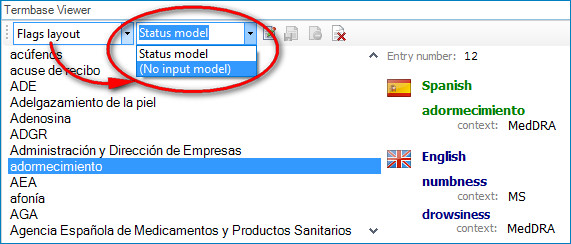
To match the changes in Multiterm 2017, the Termbase Viewer has a new layout, which is now the default layout. I think it’s more intuitive for less-experienced users, because you don’t have to hunt for tiny icons to edit, save or delete entries. These now appear as you hover over a field or are displayed to the right. And a friendly “undo” button appears when you’ve finished editing.
A scroll bar has been added to the right, which is handy, but where I really miss one is for scrolling down the term list on the left.

There are a couple of reasons why you might want to switch back to the old Flags layout: The term entries in the new layout are less compact and take up more screen space than before. Also, the option to select the input model hasn’t been implemented yet in the default layout.
High-DPI monitors
Studio 2017 now displays better on high resolution screens. On my 12” 4K laptop, I set text size to 250%, and Studio performs well.
Click on this screenshot of the Project window to see it as a full 3839 × 647 pixel image:

File Types: Preview file
A small but useful new feature is the ability to preview a file before opening it in the Editor. The preview is available at the bottom of each window under all file types.

This is handy when you make changes to file type options and want to see if the settings have the desired effect on your file. For example, I had a Word document with text instead of numbers in a numbered list:

I enabled Extract custom numbering in the Word 2007-2016 file type and checked with the preview that it would be translatable in the Editor:

A bunch of little improvements
When you create a new project, a list of recently-used languages now appears. (The new colourful range of flags is also bright and cheerful!)

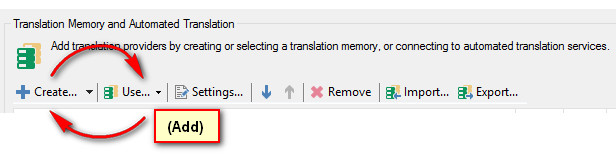
In the TM options in Project Settings, the old Add and Create buttons have been switched round and Add is now called Use. It takes a few days to get used to, but definitely makes sense.
In the Translate Single Document wizard, source and target languages can now be reversed.

In the tabs that show Translation Results, Concordance and Fragment Matches, the relevant names now appear at the beginning, not at the end.

(Click the screenshot to open it enlarged in a separate window)
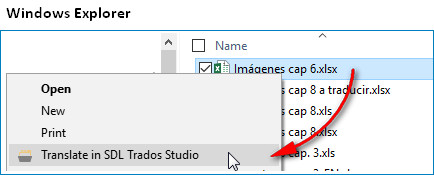
In Windows Explorer, you can now use the context menu to open a file in Studio. Right click the file, select Translate in SDL Trados Studio and it’ll open in Studio via the Translate Single Document wizard.
Getting Studio 2017 up and running
You may be looking forward to trying all these new features, but are worried about switching from the version you’re familiar with. How should you go about making the change? If you have the Freelance version, you can upgrade to Studio 2017 without deactivating Studio 2015, keeping the old version running just in case. Move your projects, customer list, plug-ins, TMs and language resource templates with the Studio Migration Utility. Read Paul Filkin’s article on the Migration app to find out more.
One last word of advice: don’t switch versions in the middle of a project. Be patient, finish the job and then enjoy exploring Studio 2017!
Translators talk Trados
If you found this blog post useful, you might want to check out the SDL series called Translators talk Trados, where other translators look at different features and explain how they use Studio in their workflow. A great chance to learn more about Studio from colleagues!


Excellent article Emma… I think your articles on Studio 2017 so far are the best introduction to the changes I’ve seen so far. Really clear and concise. Nice work!
Thanks, Paul! I’ve got one final article in the pipeline about Studio layouts, but right now I need to get a big project off the ground and delivered next week. Work first, then play!
Hi Emma,
Thank you for your insightful article.
Just one question. Can Adaptive MT only be used if you have Language Cloud enabled?
Many thanks,
Peggy
Yes, Peggy, you have to enable SDL Language Cloud Machine Translation.
To do that, go to File>Options>Language Pairs>All Language Pairs>Translation Memory and Automated Translation>Use and select it from the drop-down list. If you want to enable it for a current project, go to Project Settings and follow the same path.
Thank you Emma! However, while I like the sound of adaptive TM, I don’t particularly want to enable SDL Language Cloud Machine translations.
If you’re worried about confidentiality, Peggy, then maybe you should try Slate Desktop. The post I’ve linked to is a comparison of Slate and SDL Language Cloud, but in the latter case, I was testing my own customised engine built and hosted through SDL Language Cloud, not their adaptiveMT. What will be really interesting will be to see the combination of adaptive technology with our own customised MT engines. Probably in the not too distant future…
Thanks for this! I saw it advertised that we could now apply two filters. I’ve got 2017 now, but I can’t figure out how to do it, and it’s not in the Online Help either. Do you know if that feature was delayed?
Hi Clark, check out my previous post on the Advanced Display Filter. It’s easy to apply two or more filters now, as you’ll see!
Pingback: Weekly translation favorites (Nov 25-Dec 8)
Hi Emma, I’m sorry I’m leaving this question here, but I couldn’t leave a reply on the 2015 post I was reading!
You said there “I ran an analysis on the target files with an empty TM, just to see the number of cross-file repetitions and total number of new words.”
Can you please tell me how do you do that??? I’m still learning some features.
Marissa, you’re probably trying to comment on the post on TO3000 and Studio analysis. I close comments after 3 months so that readers don’t ask endless how-to questions – the best place for those questions is the SDL Community forum.
You’ll find steps for running an analysis in my blog post on fuzzy match grids (scroll to the bottom). Another way of doing it is to download the standalone goAnalyze tool from the SDL App Store. Set up the app and then drag a file onto the desktop icon.
Pingback: SDL Trados Studio features in 2009, 2011, 2014, 2015 and 2017 | Signs & Symptoms of Translation