![]() Continuing from last week’s blog post about the new Studio 2021, here’s a post all about SDL Trados Live (Essential edition), a system for translating files in your browser that comes bundled as a 12-month package with your perpetual Studio 2021 license. It’s very green but has huge potential. First, I’ll explain how to translate in SDL Trados Live; then, I’ll talk about why you might or might not want to use it.
Continuing from last week’s blog post about the new Studio 2021, here’s a post all about SDL Trados Live (Essential edition), a system for translating files in your browser that comes bundled as a 12-month package with your perpetual Studio 2021 license. It’s very green but has huge potential. First, I’ll explain how to translate in SDL Trados Live; then, I’ll talk about why you might or might not want to use it.
- How to translate in SDL Trados Live
- Learning curve
- Delightful discoveries
- Why you might want to translate and work with SDL Trados Live
- Why you might not want to translate and work with SDL Trados Live
- The race is on
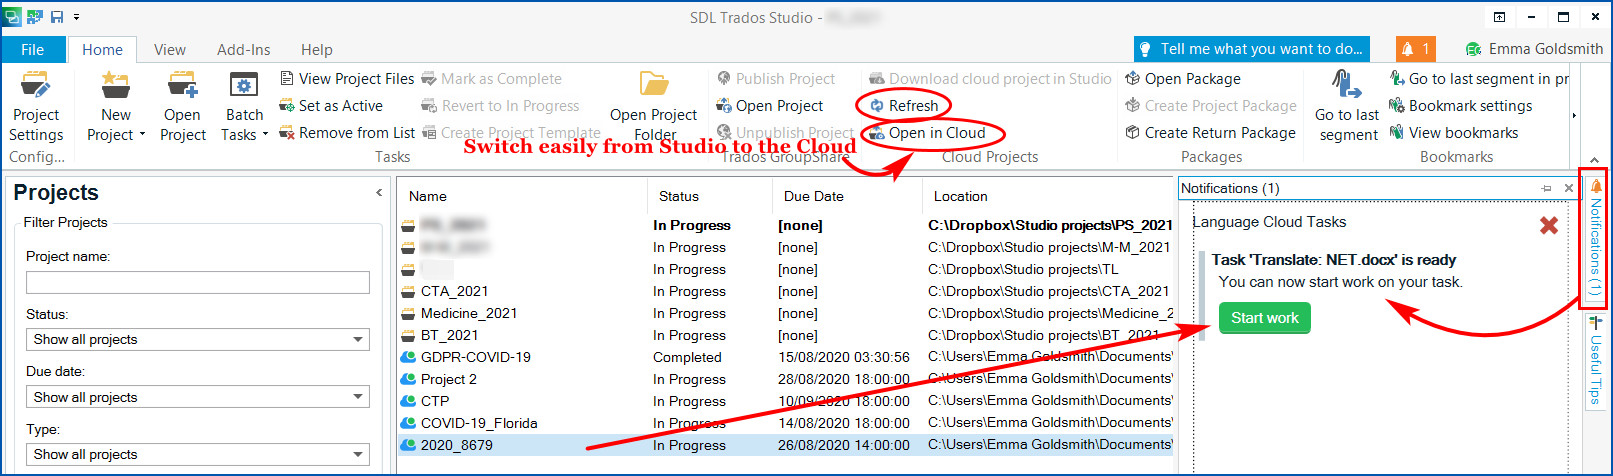
Before you rush off to translate your first file online, I recommend you watch a 12-minute video by SDL, also accessible via the Welcome view in SDL Trados Studio 2021, under Language Cloud and SDL Trados Live. The video explains the various tabs and views in SDL Trados Live, walks you through a Cloud project and explains how to switch from Cloud to Studio and back again.
However, the video doesn’t explain how to set up your translation resources – translation memories (TMs), termbases (TBs) and machine translation (MT). Translations resources are the building block for all your work in SDL Trados Live, so here are the basics for getting started.
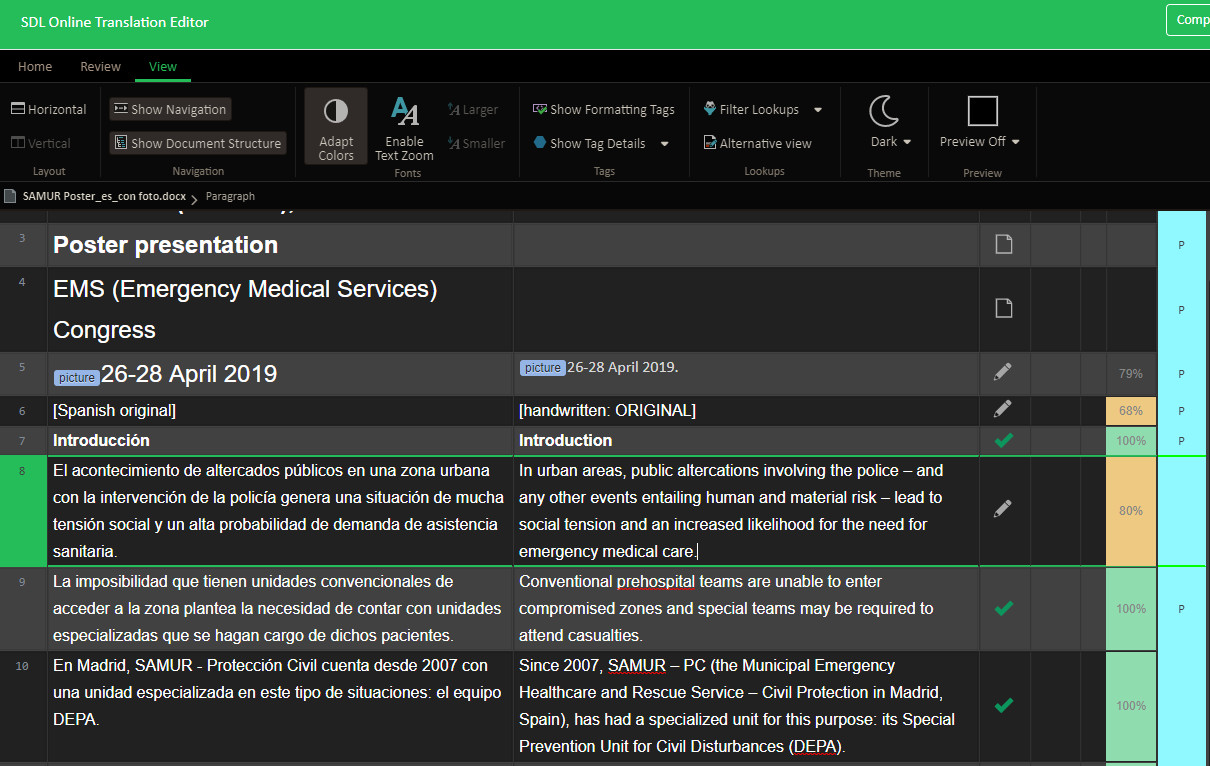
How to translate in SDL Trados Live
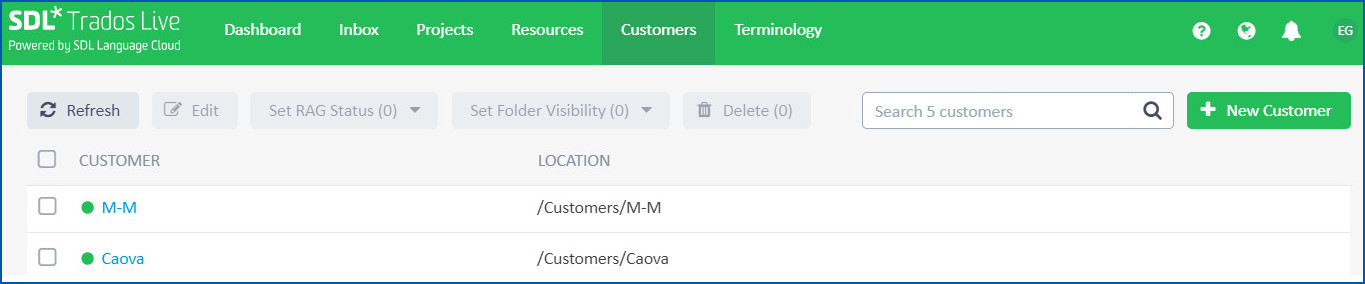
Open SDL Trados Studio 2021. Go to the Welcome view and click the Language Cloud and SDL Trados Live link. You may have to sign in to your SDL account the first time, but from then on SDL will remember you. You’ll arrive in the Dashboard. The window on the left prompts you to create a customer.
- Click Add in the “Add Customer” box. Add a customer name and leave the location unchanged (Customers). [Note: I also added some working fields here to reflect my desktop workflow, but this may not be advisable – see comment under ‘Learning curve’.] Click Create.
(Click any image to see an enlarged version)
Don’t click the customer name and don’t add a project template if prompted. The next step is to set up your translation resources (TM, TB, MT).
- Go to the Resources tab
Tip: think carefully about the location of all your resources; this is the one setting that can’t be changed later.
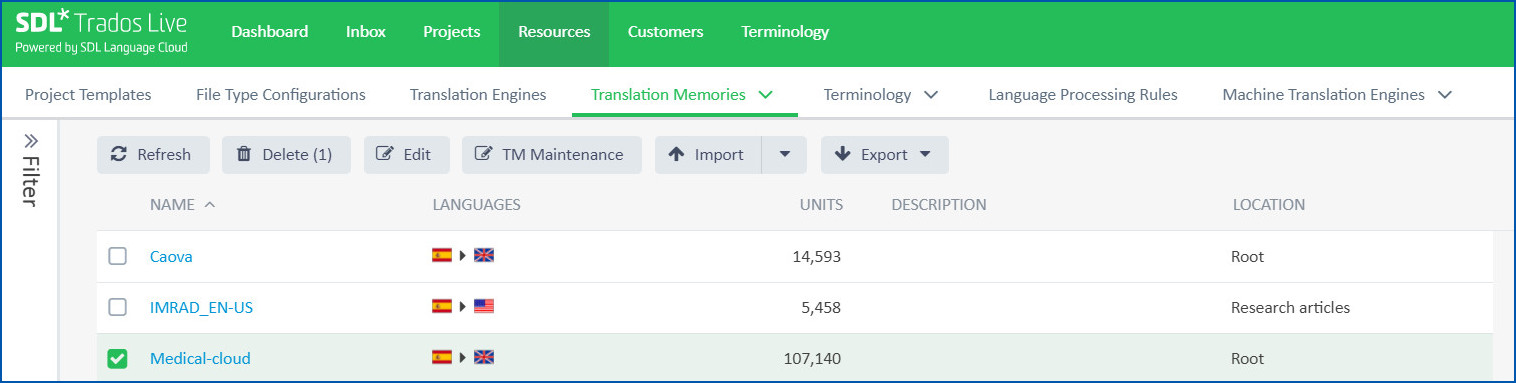
Translation Memories To upload an existing TM, first create an empty TM in the Cloud and then populate it with your local TM. To do that (or to simply start a fresh TM in the Cloud), click New translation Memory and complete the details. Set the location to your newly created customer (if applicable) or to the root folder (if not). [Tip: To select languages, enter ISO abbreviations, such as EN-GB and ES-ES.] Save. Now select the new TM by ticking the box on the left and select Import above. Browse to your local TM and upload it. Click Finish. Importing may take a while; when it’s done, click Refresh to see the changes.
Terminology Under Termbases, click New Termbase and follow the wizard. [Tip: To import an existing TB, export the definition file and your existing TB in .xml format.]
Machine Translation Engines Add an NMT model. (I don’t use MT, so I can’t give guidance on this. The choice seems overwhelming, with no filter or search field.)
Translation Engines This is where you pool your pre-prepared resources into a single unit. Go to New Translation Engine and follow the wizard.
Project Template A template is useful to save entering basic settings repeatedly. [Tip: in the video a project template is created in the customer folder, but if you want to keep the template in the long term, save it in the root folder.] The wizard will take you through adding your newly created translation engine and adjusting settings. All Studio desktop settings are available (TU matches, pretranslate, QA, penalties, TM fields, etc.).
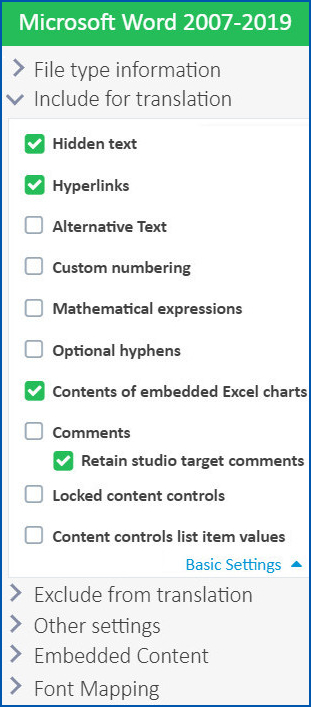
File Type Configuration SDL Trados Live lets you configure settings for a host of file types and create new ones. (See screenshot on right.) Leave the default settings here or change the settings, for example, to be able to translate source comments in a Word document or notes in a PowerPoint file.
- Create a project
Now you’re ready to create and translate your first project. Cloud projects can be created very easily back in Studio 2021 (Go to New Project>New Cloud Project and follow the wizard) or in your browser in the Cloud itself. Regardless of where you create it, you’ll be able to translate and revise the project from either or both locations. To create the project in the Cloud, see the video in the link above (start at minute 05:05) or follow the steps below for a few extra tips.
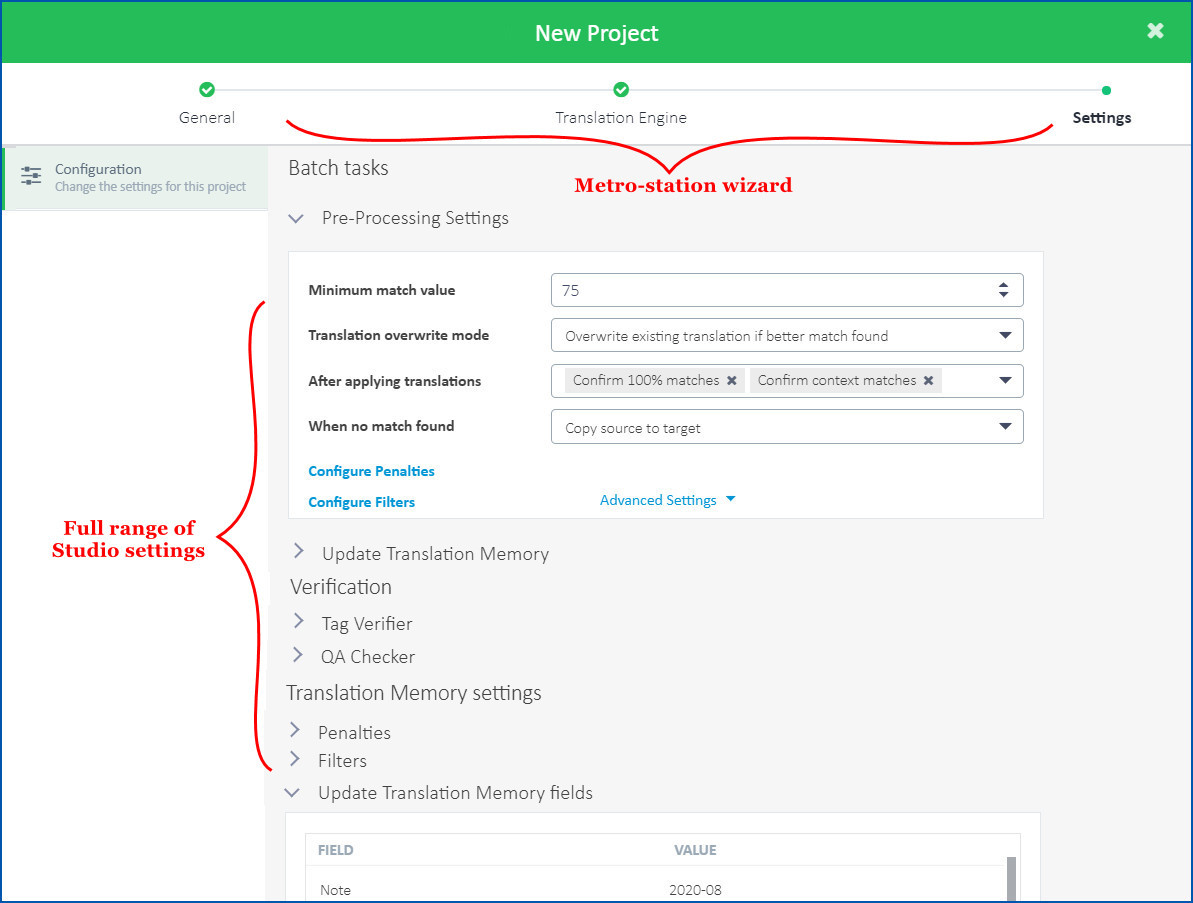
- Click the Projects tab at the top and then New Project in green on the right. Run through the wizard using the project template you created (or start from scratch), drag in or browse to your source file(s), go to Next to check your translation engine has been added. Tweak Settings if needed (see screenshot above). Click Create. You’ll be taken to the Projects tab.
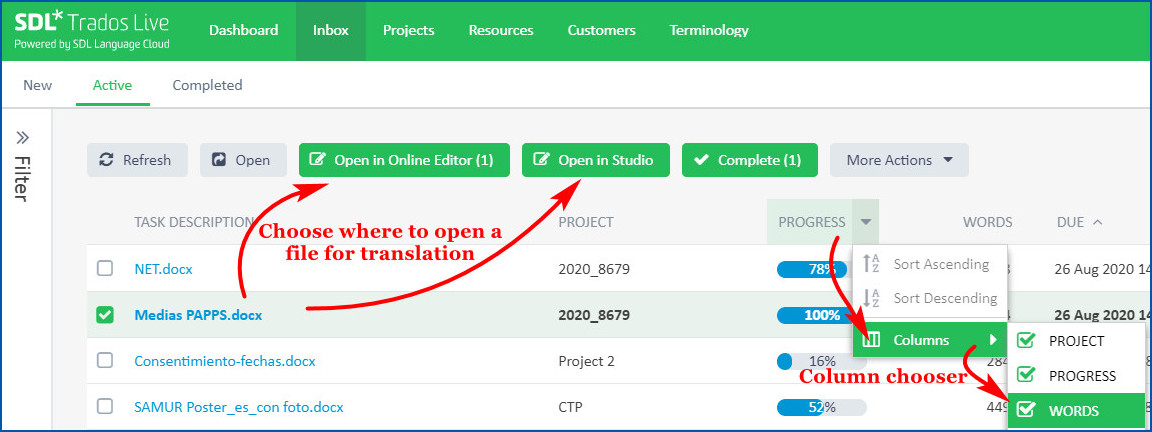
- Go to the Inbox tab and select the files by ticking the box on the left (don’t click the file names). Click Accept (Tip: if you click Open in Online Editor before accepting, you’ll see a read-only version). Confirm. If the files disappear, click Refresh.
- Select the file by ticking again and click Open in Online Editor (or Open in Studio – the seamless online-local workflow really comes into play here). The first time you open a file in the Online Editor you’ll see tips appearing.
- Translate the file in the Online Editor. (See video min. 08:04.) All changes made in the Cloud will sync with the project files in Studio and vice versa, so you can switch between the two mid-translation.
- After finishing the translation, click Generate Target File and Complete. The file then moves in the Inbox from active to completed. If you’re working in Studio, run the batch task Generate target files (Cloud projects). (Note: If you save the target file from the Online Editor you can choose where to save it. If you save the file in Studio, a notification will pop up in the right-hand pane when it’s done. Double click the notification link to open the location in File Explorer.)
Tip: In Studio and in the Cloud, click Refresh whenever a step is pending.
Tip: Project preparation may take a while in the Cloud. In Studio, keep track of progress in the Notifications view:
I’ve been on a steep learning curve to get the hang of this new browser interface. The main action takes place in the Inbox tab where you need to get used to seeing tasks (files) displayed by status (new, active, completed) instead of by project. Green buttons help to show available actions; the filter on the left is useful for long task lists; and all columns can be hidden and ordered. Clicking a file name in the Inbox will take you to statistics, not to the Online Editor. Right-clicking files or projects will simply call up the browser context menu, so you’ll need to retrain your right-click muscle memory.
Another learning curve was adapting my own workflow. In Studio, I have ongoing projects for subject fields and major clients. But in SDL Trados Live you can’t delete files from projects, so they would soon become unwieldy; setting due dates is obligatory, which makes no sense for my Studio workflow. I’ve learned to use project templates to quickly set up projects for single files, enter a deadline, translate, deliver and delete. This new workflow is solid and slick, I must admit.
Learning curve – Online Editor
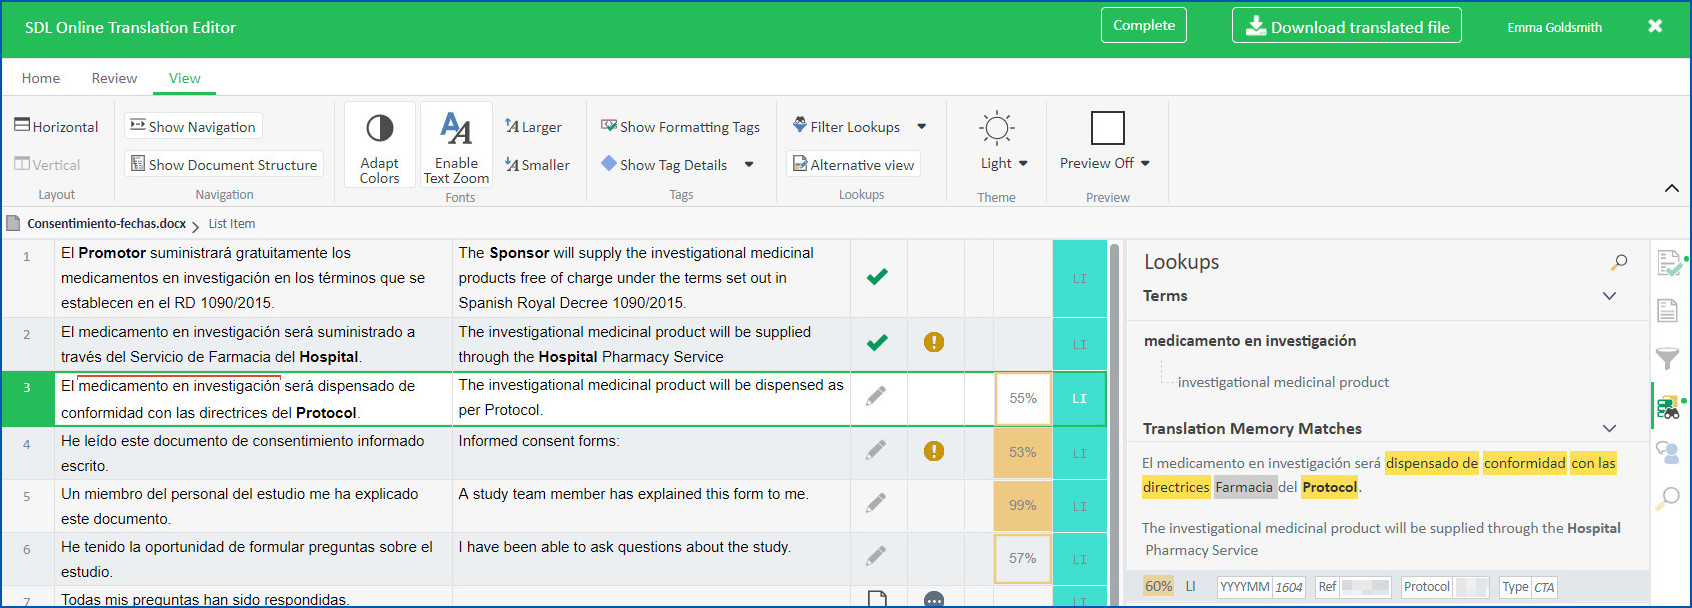
The learning curve here is gentler. Shortcuts are mostly the same as in Studio and core functionality has been successfully transferred to the Online Editor. You’ll need to readjust to viewing lookup results (from TMs and TBs) squeezed into the right-hand pane along with comments, Find&Replace, QA and filters. The pane can be resized but not repositioned.
To merge segments, the shortcut is the same as in Studio (Ctrl+Alt+S), but the action is quite different. Place the cursor anywhere in the active segment and apply the shortcut or go to Home>Other Actions>Merge. The segment will immediately merge with the one below.
To use QuickPlace to apply tags or termbase hits, the shortcut is the same (Ctrl+,) but you must use the down arrow to select the first suggestion before clicking Enter.
Delightful discoveries
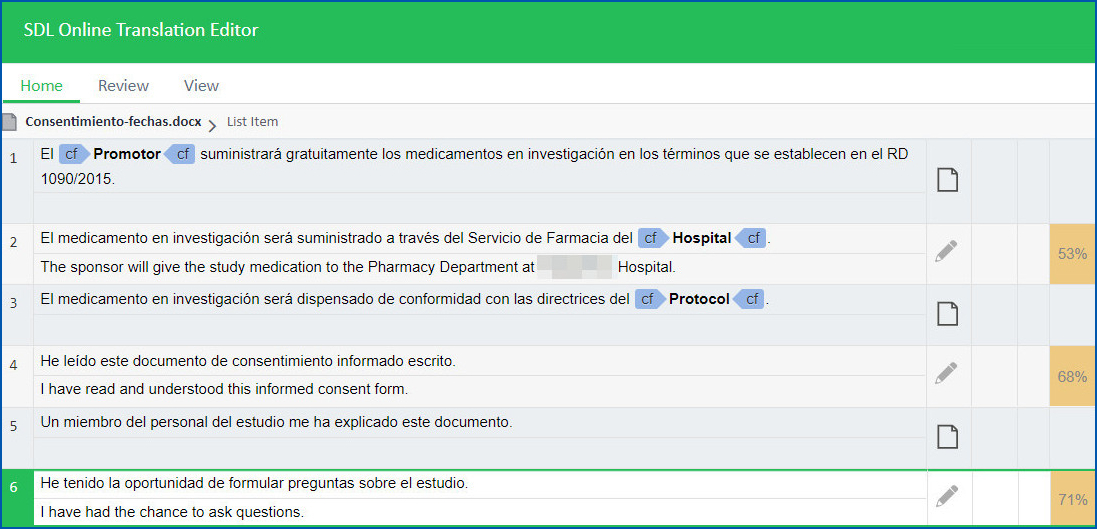
The Online Editor brings some cool features not available in Studio. The sorely missed horizontal display (source-above-target instead of side-by-side layout) has reappeared! It’s taken ten years, so most of us don’t miss this layout anymore, but if you do, here it is:
Despite a lack of scientific evidence that dark modes are easier on your eyes, apps (MS Office, Chrome, WhatsApp) are increasingly adopting light-on-dark as a popular alternative. Here’s a nod to translators who need a night mode:
The Find and Replace panel is a welcome enhancement in the Online Editor. Here, like in MS Word, you can see all instances of a word or string in your file. The panel shows the number of instances found and lets you search in source and/or target, in tags, with regex, etc.

Why you might want to translate and work with SDL Trados Live
- Use Trados natively in almost any browser and on any platform. Think Mac and Linux.
- Work on devices where Studio isn’t installed. Think computer crashes and moving to a family or a library computer.
- Translate a project at your desk and then settle down in an armchair with your tablet to revise it, taking advantage of the source-above-target display.
- Store your TMs and TBs in the Cloud, where they’re secure and accessible.
- Switch from a desktop computer in your office to a laptop when travelling, without copying TMs and mirroring projects.
- Collaborate with others in the Cloud (only with SDL Trados Live Team, the next level up from the Essential edition).
- Prepare one project in the Cloud while working in Studio on another. Good for major assignments with multiple files and huge TMs. Useful for project managers.
Why you might not want to translate and work with SDL Trados Live
The Online Editor has a solid set of features. But as Studio users, we’re used to more choice (customised layout; shortcut creation; font adaptation in lookups) and more features (fragment recall; match repair; rich AutoSuggest; total TB integration). That takes some beating.
SDL Trados Live relies on a fast, robust internet connection. I have fibre broadband, but very occasionally the connection drops completely. Even with up- and download speeds approaching 600 Mbps, lookups are slightly sluggish. Also, I like working on trains and planes. Switching from a local to a cloud project simply doesn’t work. Local and cloud TMs don’t synchronise.
SDL Trados Live is still very green, but I’m sure we’ll see continuous improvements with some or all these features appearing in the coming months:
- Studio package capability
- Customisable email notifications (disable all/some notifications)
- Display changes retained when reopening the Online Editor
- Tighter whitespace display
- On-the-fly file merging in the Online Editor
- ‘Replace all’ functionality in Find and Replace
- AutoSuggest dictionary capability
- AppStore adapted for online use
- Direct TB import (not through xml conversions and TB definitions)
- Direct TM export (.sdltm files, not zipped tmx)
The race is on
Will perpetual licenses holders decide to renew their subscription next year for €75/year? Will new users be tempted by the Studio 2021+SDL Trados Live subscription bundle for €295/year? That depends how the product matures over the next twelve months. Me? I’m on the fence.


Thank you for an interesting article! I am testing the online tool Memsource at the moment where look-up is instantaneous much quicker than on my desktop Studio 2019, so I was surprised to learn that the Trados Live lookup is slightly sluggish.
A couple of comments to the section “Delightful Discoveries”:
Horizontal display when reviewing is available for the desktop version through a plug-in:
https://appstore.sdl.com/language/app/vertical-review/768/
It is possible to get a ‘nightmodish’ look for the desktop version using f.lux.:
https://justgetflux.com/
Yes, I’m aware of the vertical layout plug-in for Studio but unfortunately it gives a preview only and isn’t editable. I found my eyes couldn’t adjust to reviewing vertically while making changes horizontally.
Thanks for mentioning f.lux. Not the same as a proper dark mode, but useful for reducing glare and better than Iristech.co, which distorts screenshots (and isn’t free).